यहाँ Lightroom के शीर्ष 5 सेटिंग्स दी गई हैं जो आपकी फोटो एडिटिंग को बेहतर बनाने में मदद करेंगी:
1. एक्सपोज़र (Exposure)
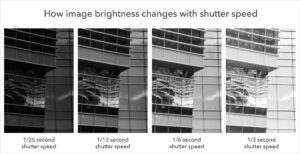
- एक्सपोज़र सेटिंग्स का उपयोग फोटो की रोशनी को नियंत्रित करने के लिए किया जाता है। अगर आपकी फोटो बहुत अंधेरी है, तो एक्सपोज़र को बढ़ाएं, और अगर बहुत ज्यादा रोशनी है तो इसे कम करें। यह सेटिंग आपको बैलेंस्ड लाइटिंग के साथ साफ और स्पष्ट फोटो बनाने में मदद करती है।


2. कॉन्ट्रास्ट (Contrast)
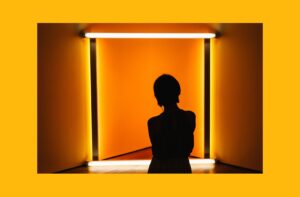
- कॉन्ट्रास्ट का उपयोग फोटो में हाइलाइट्स और शैडोज़ को बेहतर बनाने के लिए किया जाता है। कॉन्ट्रास्ट को बढ़ाने से आपके फोटो में गहरे रंग और उजले रंग अधिक स्पष्ट होते हैं, जिससे फोटो में गहराई और डाइमेंशन आता है।


3. वाइब्रेंस (Vibrance) और सैचुरेशन (Saturation)
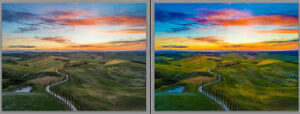
- वाइब्रेंस सेटिंग उन रंगों को बढ़ाती है जो बहुत ज्यादा सैचुरेटेड नहीं होते, जिससे फोटो नैचुरल दिखती है। सैचुरेशन पूरे फोटो के रंगों की गहराई को बढ़ाता है। इसे संतुलित तरीके से इस्तेमाल करना महत्वपूर्ण है ताकि रंग बहुत ज़्यादा ना लगें।

4 . हाइलाइट्स (Highlights) और शैडोज़ (Shadows)
- हाइलाइट्स सेटिंग से फोटो के सबसे रोशन हिस्सों को नियंत्रित किया जा सकता है, जबकि शैडोज़ से अंधेरे हिस्सों को। अगर फोटो में बहुत ज्यादा चमक या अंधेरा है, तो इन सेटिंग्स से बैलेंस किया जा सकता है।

5. क्लैरिटी (Clarity)
- क्लैरिटी सेटिंग का उपयोग फोटो के टेक्सचर और डिटेल्स को बढ़ाने के लिए किया जाता है। इसे बढ़ाने से फोटो में शार्पनेस आती है, जबकि इसे कम करने से फोटो में एक सॉफ्ट इफेक्ट आता है। यह सेटिंग खासकर लैंडस्केप और पोर्ट्रेट फोटोग्राफी में बहुत काम आती है।

Top 5 Settings in Adobe Lightroom to Enhance Your Photos
Adobe Lightroom is a powerful photo-editing tool, but to get the most out of it, you need to know the best settings. In this article, we will explore the top 5 settings in Adobe Lightroom that can help you take your photography to the next level. Whether you are a beginner or a pro, mastering these settings will drastically improve the quality of your edits.
1. Exposure – The Foundation of Great Edits
The first of the top 5 settings in Adobe Lightroom is Exposure. This setting allows you to control the brightness of your photo. If your image is too dark or too bright, adjusting the exposure will bring balance, giving your image a more polished look.
2. Contrast – Add Depth to Your Photos
Another essential setting among the top 5 settings in Adobe Lightroom is Contrast. By increasing the contrast, you make the darker and lighter areas of your photo more distinct, adding depth and texture to your images. This setting is particularly useful for landscape and portrait photography.
3. Highlights and Shadows – Fine-Tune Your Lighting
The Highlights and Shadows sliders are also part of the top 5 settings in Adobe Lightroom. Highlights help to manage the brightest parts of the photo, while Shadows help bring out the details in the darker areas. Adjusting these settings can bring a more balanced lighting effect to your photos.
4. Clarity – Enhance Texture
Among the top 5 settings in Adobe Lightroom, Clarity stands out for adding sharpness and detail to your photos. Increasing clarity makes the textures in your image more pronounced, which is ideal for landscape photos or any image where you want to highlight intricate details.
5. Saturation and Vibrance – Perfect Your Colors
Rounding off the top 5 settings in Adobe Lightroom are Saturation and Vibrance. These settings enhance the colors in your photos. Saturation boosts all colors, while Vibrance specifically enhances the less saturated colors, ensuring that your photo looks natural yet vibrant.
Conclusion
Mastering the top 5 settings in Adobe Lightroom—Exposure, Contrast, Highlights and Shadows, Clarity, and Saturation/Vibrance—will significantly enhance your editing skills. By applying these settings effectively, you can turn ordinary photos into stunning visuals that stand out.
Top 5 Settings in Adobe Lightroom for Perfect Photo Editing
When it comes to professional photo editing, mastering the top 5 settings in Adobe Lightroom can make a world of difference. Lightroom offers a wide range of tools and features, but focusing on these key settings will help you enhance your images more effectively and efficiently. Whether you’re just starting out or have been using Lightroom for a while, understanding these settings is essential for achieving the best results.
1. Exposure – Control the Light in Your Image
The first of the top 5 settings in Adobe Lightroom is Exposure. This setting allows you to adjust the brightness of your photo, making it either lighter or darker. It’s essential for balancing underexposed or overexposed photos.
2. Contrast – Add Drama to Your Photos
Next in the top 5 settings in Adobe Lightroom is Contrast. Increasing contrast can bring out the differences between the light and dark areas of your image, adding depth and dimension.
3. Highlights and Shadows – Fine-Tune the Light Balance
Among the top 5 settings in Adobe Lightroom, adjusting Highlights and Shadows gives you control over the bright and dark parts of your image, allowing you to recover details from overexposed or underexposed areas.
4. Clarity – Sharpen and Define Your Photo
Clarity is a key setting in the top 5 settings in Adobe Lightroom for adding mid-tone contrast. This makes your images appear sharper and more defined, especially useful for landscape and portrait photography.
5. Saturation and Vibrance – Perfect the Colors
Finally, in the top 5 settings in Adobe Lightroom, Saturation and Vibrance enhance the colors in your photo. Saturation boosts all colors equally, while Vibrance enhances only the less saturated colors, keeping your photo looking natural.
Conclusion
By focusing on these top 5 settings in Adobe Lightroom—Exposure, Contrast, Highlights and Shadows, Clarity, and Saturation/Vibrance—you can quickly improve your photo editing skills. These settings give you precise control over lighting, contrast, and color, helping you achieve professional-quality results.


